The Warn Group
See How Well Flares Dress Up This Jeep JL Rear Fender!
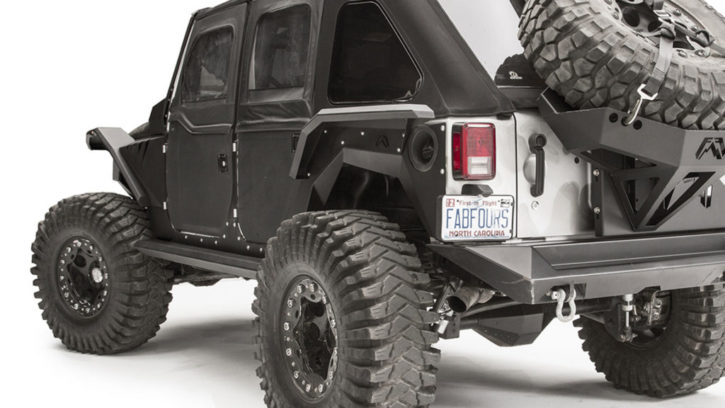
Loving the look of the Fab Fours rear fender flares for your Jeep Wrangler JL but groaning at the thought of installing them?
Just like most everything else that Fab Fours designs, the open fenders and flares for the Jeep Wrangler JL go on with minimal work in just a few hours time.
Using the included hardware and a few simple tools, you or your body shop can get these fender flares mounted onto your JL and transform its look!
Check out how simple the installation is in the informative, easy to follow instructional video below.
Step By Step Jeep Wrangler JL Rear Fender Installation
Today we’re going to install a Fab Fours fender flare on a 2019 Jeep Wrangler JL; let’s go ahead and get started.
Alright, so we’ve got a total of six pushpins to remove here, we’ve got one, two, three, four, and up top five and six.
Go ahead and pop those out.
This whole thing is held on by clips, so we’re just gonna go ahead and pop it loose working from the back side to the front.
Any clips that did not come off with the flare, I’m just gonna go ahead and pop off with the tool.
OK, so we went ahead and put our templates in place; we’ve got two of them, we lined them up to a couple of the holes that are there.
What we’re gonna do next is cut along this red line, basically make all the yellow go away.
You’re gonna see a few different angles of cuts because we’re gonna take it in chunks.
Make sure you wear personal protective equipment.
(Cutting where indicated by the template.)
So we went ahead and taped all this area off; we also spray-painted up into areas where we cut so it doesn’t rust.
Next I’m gonna go to these two holes right here, I’m going to expand those out to 17/32nds.
Now as I go through this top hole, I’ve got some material that’s kind of angled behind there.
What I want to do is I want to go through nice and slow and penetrate nice and deep into that material because when I put the nutsert in there, it’s gonna pull it to the side if I don’t have that material removed.
So I’m either just gonna be able to drill straight through that nice and slow and make a nice hole or I’m gonna have to put like a punch awl in there and bang that material out of the way, one of the two.
OK, so if you’re not familiar with a nutsert, I’m going to go ahead and explain it to you.
Basically, you have threads on the inside, this inserts in there; inserted, it’s a nutsert.
So what we’re gonna do, it comes with multiple pieces; you’ve got this tool here, it’s got teeth on one side, that faces the nutsert then you have a bolt that goes through that.
What I like to do is add a washer past that bolt, it goes through that sleeve and then threads into the nutsert.
Once that’s threaded all the way in, you can then take and insert that into the hole that it’s going into.
Once this is inserted into the hole, you’re going to hold onto the sleeve with a 9/16″ wrench, and then I’m going to use an impact driver to tighten it down.
As I tighten it down, it’s going to crush that sleeve around the hole I just drilled.
You’ll hear the difference in the sound of that nutsert as I tighten it down.
Once it’s all the way tightened down, then continue to hold onto that sleeve with the wrench and then back the bolt back out.
Nutsert is installed.
All right, next nutsert installs the exact same way.
All right next what we’re gonna do is install our bracket up to those nutserts we just installed.
The nut on the bracket is welded in place and it needs to be facing out when it goes in place here.
We’re gonna take our included bolt, lock washer, and flat washer and thread into those nutserts like so.
Another thing that I will recommend is chase those threads with a tap just to make sure there’s no powder coat inside there.
You don’t want to put your hardware through that unless that’s already chased out, otherwise, you can mess up your hardware.
OK, so we went ahead and we dry-fitted the fender flare up against there using this bolt hole and also this bolt hole down here; we just put the hardware in there temporarily.
I went ahead because this is stainless steel going into a carbon steel nut; I went ahead and I put a little anti-seize lubricant on there.
Then we lifted up the back side and got everything lined up where we wanted it and put a little clamp in place, to hold everything in place.
Now what I’m gonna go ahead and do is mark all the different holes where I have to drill and then I’ll go back and install nutserts where they need to go.
Once all those are marked, then we’ll go ahead and pull that off and do our drilling.
So we went ahead and peeled off all the tape, now we’re gonna go ahead and install nutserts in the top three holes.
All right, now that we’ve got all our holes drilled and nutserts installed, we’re gonna go ahead and lift up the flare and line it up to all those holes.
The center and top three holes are going to use the fatter bolts with flat washers; the bottom three holes going through the pinch weld, those are gonna use the smaller bolt going through the flat washer.
On the other side, we’re gonna have a flat washer, lock washer, and nut.
On all that hardware, we’re gonna want to use a little bit of anti-seize just to make sure it can come back apart if we need it to.
We’re going to repeat that entire process on the opposite side.
Well, that concludes the installation.
If you have any questions, call the experts or visit us online.
Bet you thought that installation was going to be a lot more involved than it actually was!
That’s just one of the great advantages of using Fab Fours fender flares to modify your off-road Jeep Wrangler JL.
We design our Jeep Wrangler JL fender flares to look great and give you superb performance! We also pride ourselves on offering fender flares that make doing modifications on your Wrangler JL fast and easy!
Fab Fours Fender Flares for Jeep JL Wranglers
Durability – Strength – Safety
Back to Product Report

